

Around this time last year I was helping a friend with some holiday goodies. They had to create a DIY gift for a bunch of friends and make several of them. Naturally I jumped at the chance to help out with a craft, especially one of multiple magnitude that would include mason jars. Not too sure what make these little guys so cute, maybe its the fact that they are glass and pint sized (lets not get into my glass bottle obsession just yet) but they are amazing for crafting.
Nevertheless, this was the end result. So I hope you'll enjoy this quick DIY for the holiday. Make them for Halloween! Use orange sparkles to be a little more fall-ish. Whatever your little heart desires!

WHAT YOULL NEED:
1. Mason Jars
(I used about 20 in total for my project, up to you if you want to go that high!)
2. LED Tea Lights
(If you're doing for example 10 jars, I'd get a pack of 12 just incase.)
3. A bottle of clear glue
4. Sand/Rocks
(Enough so you can fill a mason jar 3/4 of the way up)
**I actually went to a local school and scooped up some
sand/rocks from the front construction area, I wanted sandy beach-ish
sand but with a little more rock in it!)**
sand/rocks from the front construction area, I wanted sandy beach-ish
sand but with a little more rock in it!)**
5. Metallic MicroBeads (you can find these at any craft store in the glitter section)
6. Krylon Frosted Glass Finish Spray
7. Newspaper or a workspace that can get dirty
8. 1 Paper Plate
8. A small jar of glitter
(the powdery kind not the kind for children's crafts)
NOTE: PLEASE DO THIS IN AN OPEN VENTILATED AREA. THE KRYLON FROST SPRAY IS TO BE USED OUTDOORS OR IN A HIGH VENTILATION ROOM. (I made the mistake of thinking if I opened all my windows I would be fine, WRONG. I had to stop midway and continue outside due to receiving a large headache accompanied by being super lightheaded.)


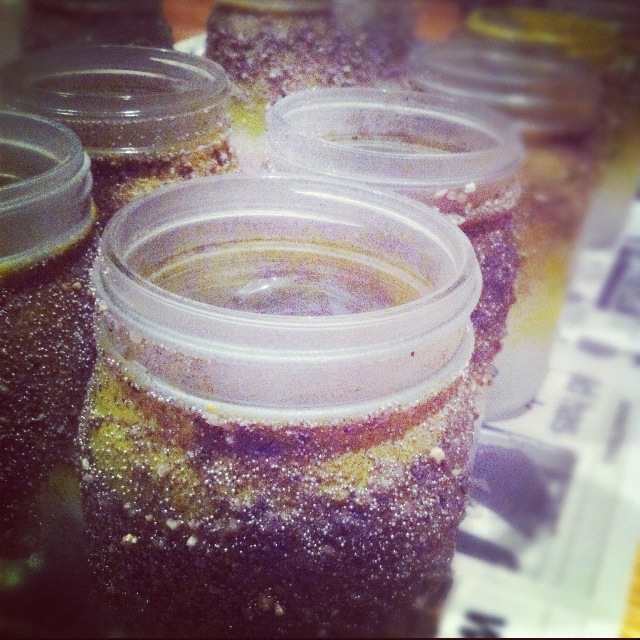
STEP ONE
Pour all the microbeads into the container holding the sand, add about 1/3 of the container of sparkles. Put lid on top and shake! Then pour onto a paper plate, try to make it evenly mixed with sparkle, sand, and rock.
STEP TWO
With the lid off, spray down the mason jar starting from the top and slowly working your way down to about 2/3 of the way down the jar. Then while the frost is still drying add a bit of the clear glue in a splatter motion (this is just to add more of a sticky surface for the rocks)
STEP THREE
Roll the now sticky surface around on the paper plate so you have an even coat of sand mix, play around a bit with it so you can get an uneven edge that reaches about midway on the jar.
I noticed that if i only sprayed the frost half way on the jar than dipped in sand it helped create that midway point. I then sprayed the jar again after the sand was on to add more frost.
STEP FOUR
Take the lid of the jar and apply glue all over the top and sides with the clear glue. Repeat process as listed above evenly spreading sand mix.

STEP FIVE
Let it all dry for at least 5 hours, or overnight if you can. Then add tea lights to the inside of the jar.
If you'd like you can even add sand to the inside of the jar and let the light rest on that, if you have
enough mix.
If you'd like you can even add sand to the inside of the jar and let the light rest on that, if you have
enough mix.
And there you go!
Little tea light jars, great for outdoors or inside. I personally liked these jars without the tops and filled with a little sand, then placed with a real tea light, but you can play around and change this up a bit as you please. Now go show all your friends the little lights you've so awesomely made and let it light up your next camping trip, or just trip through your home.
Until next time
xx
No comments:
Post a Comment